|
P10: Setting up the Simulator II |
|
|
Breakpoints Scroll down through the Assembly window until you get to line 198 near the "Prompt1:" label. In the narrow column between the line number and the assembly code, left-click then right-click which should produce a green BP or BreakPoint. Put another BP at line 205.
Full Speed! In the main "IDE" window that you first fired up, click on the "Rate" drop-down menu and select "Ultimate". <CTRL><F6> also works. Within the IDE under "Simulation" choose "Start". You should see the Sim's black line cursor jumping from line code to line code until it encounters the "BP" at line "198". With your mouse cursor within the IDE window, press <F2> to watch the Assembler advance through the code one line at a time each time you press <F2>.
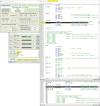
Can't See Nuttin'! From the Assembly window we know the prompt is being displayed but we cannot see what the user would see. With your cursor in the IDE window (it's important to keep our cursor in the IDE window if you expect the function keys like <F2> to work properly), press <F3> or navigate to Simulation | Stop. We need to setup a display terminal to see the code run: IDE | Tools | Peripheral Devices. Place the new window as you see in the adjacent screenshot. We'll add more relevant windows later.
Setting Up the IDE Terminal We know the ACIA uses port "$5000" to send and receive. At the top of the Peripheral Devices (PD for short) window, enable "Device 1" and set the I/O Port # to "5000" when prompted. You'll need to set this as an input port by selecting "IN". All of the other devices should be left at "OFF". About 2/3 of the way down the window on the left hand side you should see "Output Terminal". Turn it on and choose I/O Port # "5000" again. $5000 is both the read and write port for the ACIA UART. The "kpRead" in line 205 is expecting a keypress from the user. We know "1" in ASCII is "$31" so that's what we'll enter at the bottom left soon. First we have to turn on the "Input Terminal" and set the I/O port to "5000".
Sending a String of Hex Bytes Still while in the IDE click the bottom middle button that reads "Send Hex Bytes". Type "31" and "OK"; you should see the string of "$31" queued for when the terminal / user is prompted to send data. We could have used the IN I/O Port at the top of this screen with "Set one-shot IN value" but we'll save that for later.
Recompile and Restart With all of these new changes, return to the Assembler window and choose Tools | Assemble & Load. In the IDE set Rate | Ultimate then Simulation | Start. In the Peripheral Devices (PD) window you should see the prompt being created in the lower window as you use <F2> repeatedly to advance through the code after it encounters the first BP. Recall that your cursor has to be in the IDE window for your function keys like <F2> to advance one line or <CTRL> <F6> for maximum speed, to work. When the code gets to line 205, you will see "$31" be "eaten" from "Send Hex Bytes" in the Peripheral Devices window. With your cursor "waiting" on line 206, examine the Processor Status Register in the IDE window. The Carry bit, C, is on (1) as usual and the Zero bit, Z, is off (0). When the input of "$31" for the number "1" is compared with "$31" in the "CMP" statement, the result should be zero so the "Z" bit should become set, that is, a "1". That means the "Branch if Equal" is true so the cursor should advance to "Launch01:" in line 212. Now the "jsr Add2" can execute.
Gotta Stop! Press <F3> to stop the simulation. We need to provide more info for the program to run as expected. First we have to clean up the environment: 1) IDE: File | Clear Memory 2) Peripheral Devices (PD): Set one-shot IN value | 31 for Device 1. (IN button must be selected first.) 3) PD: Output Terminal | Clear 4) PD: Input Terminal | Send Hex Bytes | 31,32,33,34 | OK (The commas are important.) 5) Assembler: remove each of your BPs with right-click, left-click. Leave one BP on line 213. 6) Assembler: Tools | Assemble & Load
Now we're ready: 1) IDE | Rate | Ultimate 2) IDE | Simulation | Start
Summary In about a minute's time you should see what has been captured in the adjacent screenshot. The "Add2" application has run but has been paused at "jmp Prompt" by the Breakpoint. In the PD window we saw the "$31" one-shot select the "Add 2" menu item and then saw the "1" appear to indicate our choice. Next we saw the numbers "1" and "2" appear followed by "3" and "4". Finally we saw the text "Sum: $0046" on a newline appear indicating our hex addition was successful.
Next We'll have a look at the "Add2" app and figure out how "BCS" works. |
(Click to enlarge)
---
|
Updated 2024-01-15
