![]()
|
Project 28: |
||||||||||||||
|
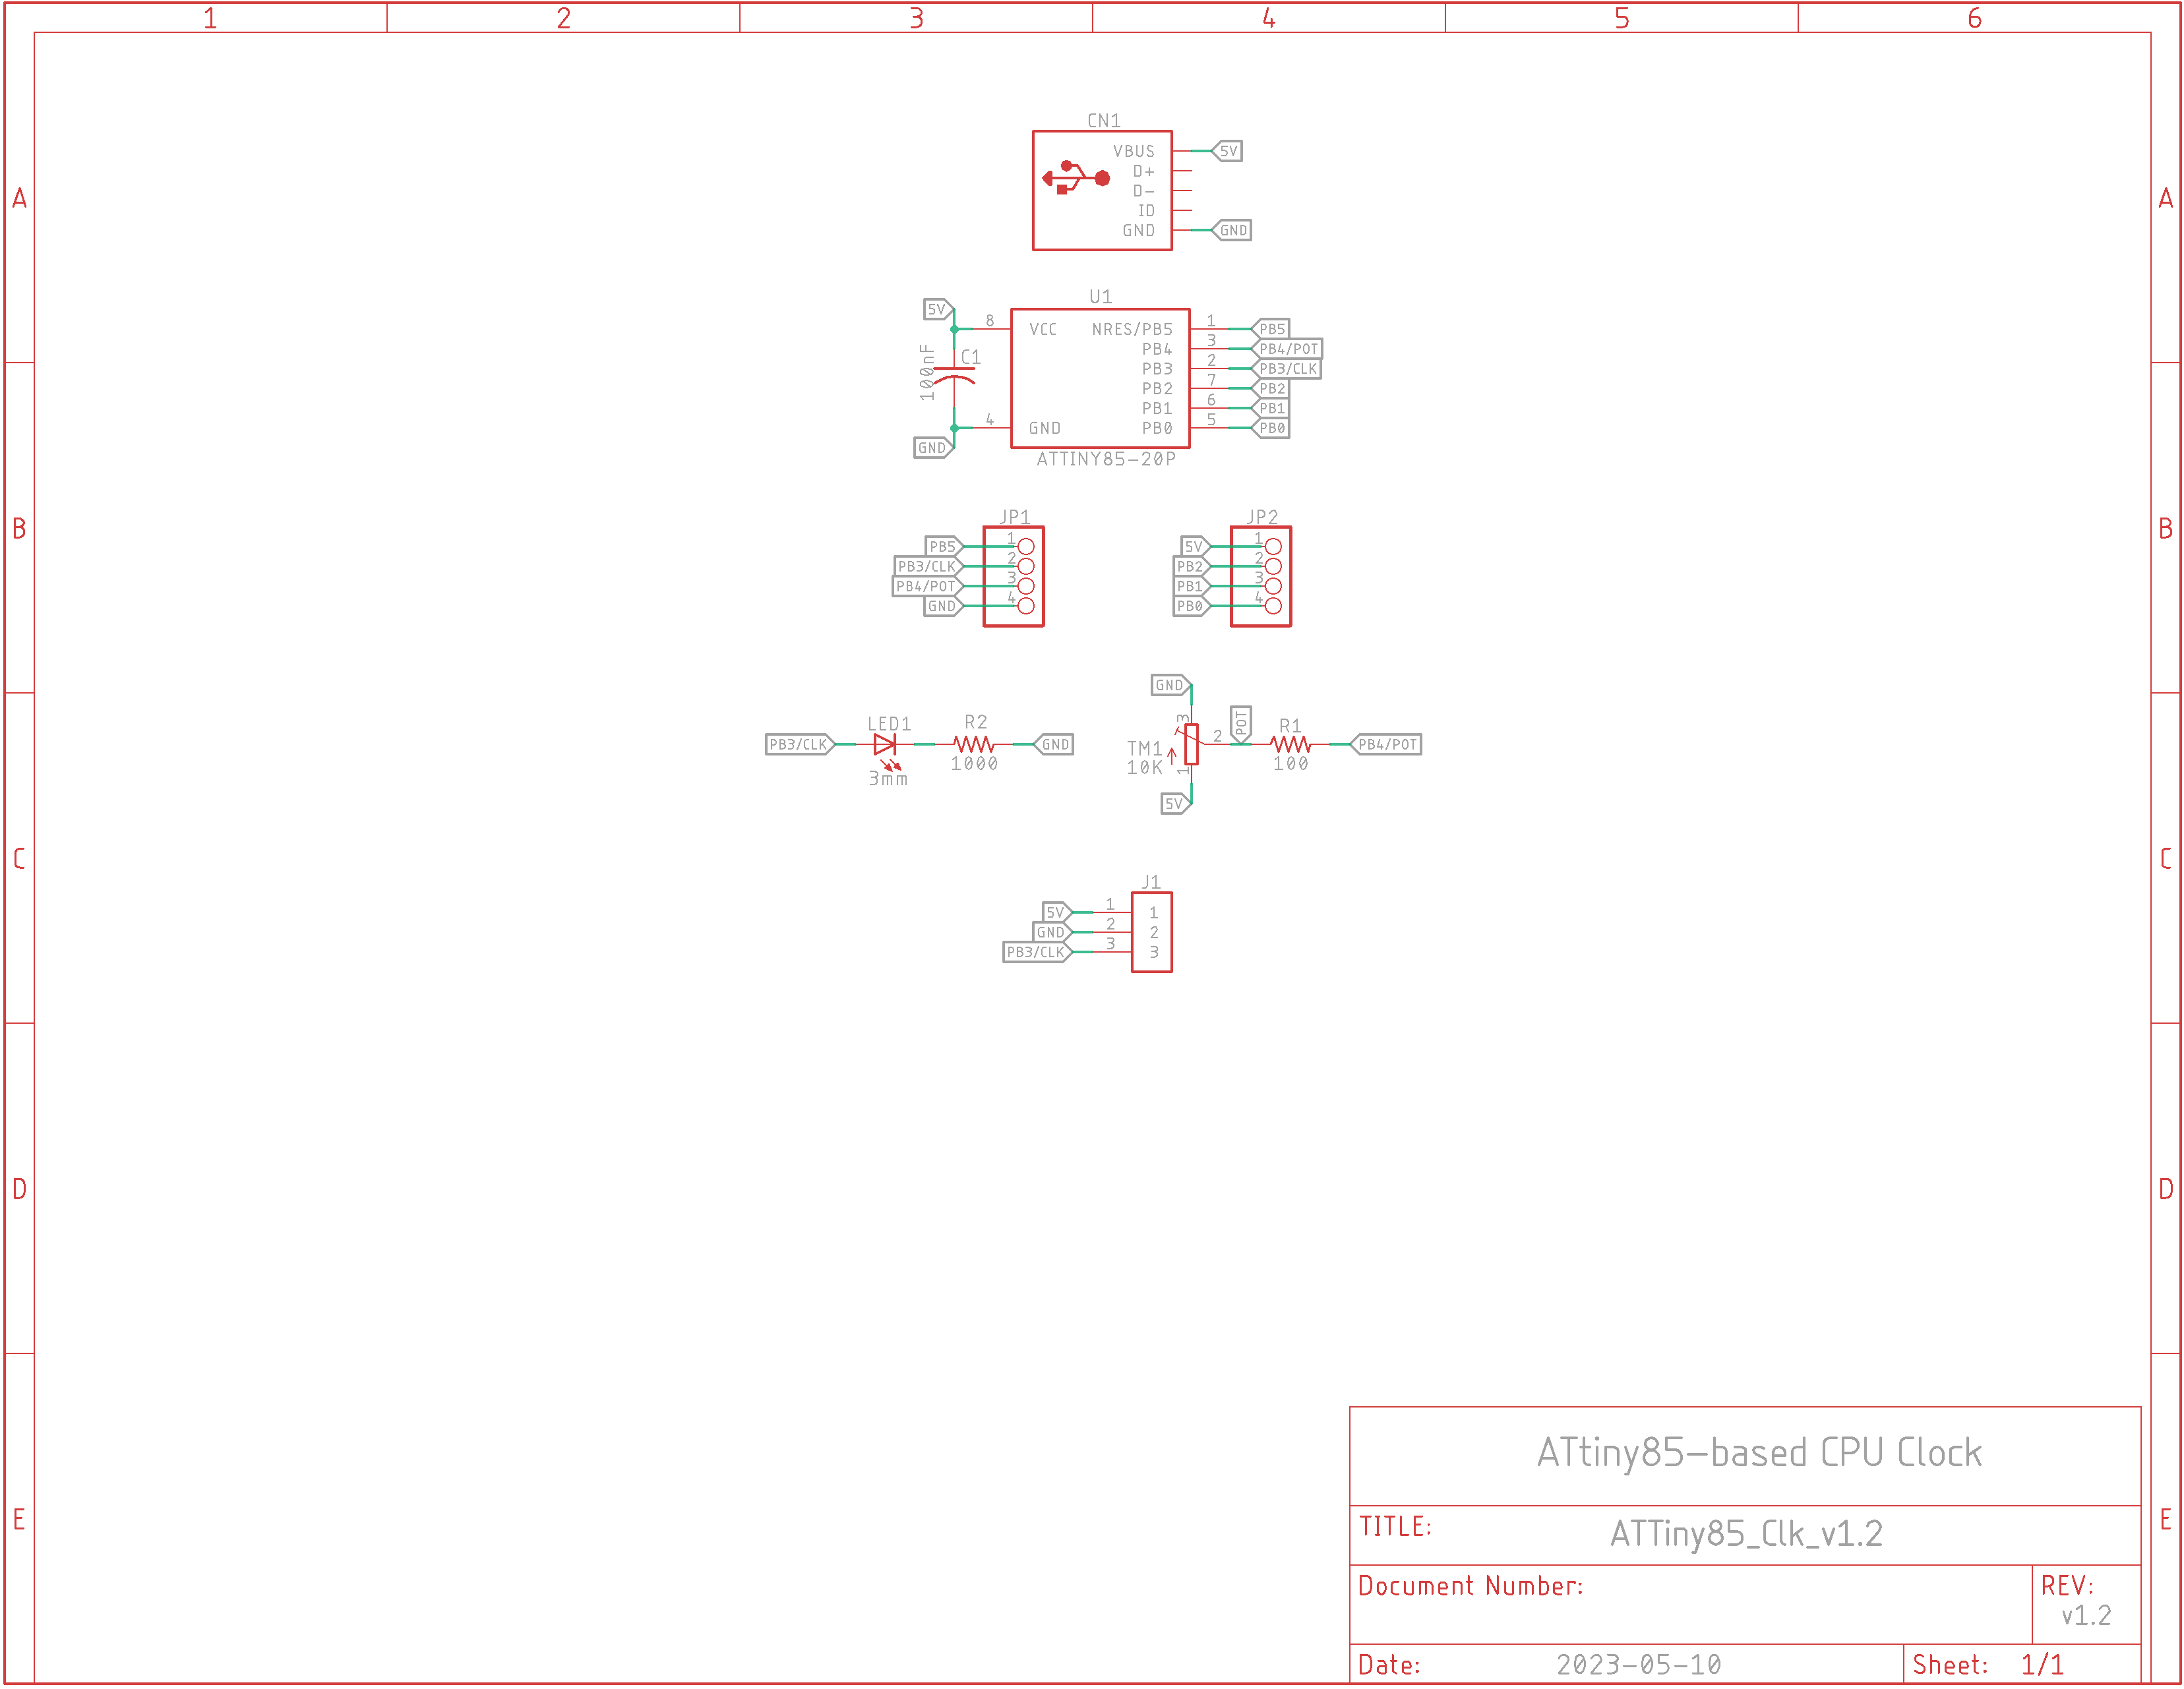
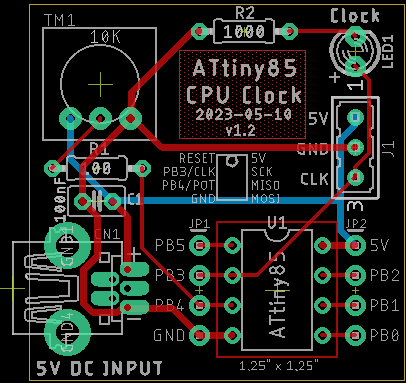
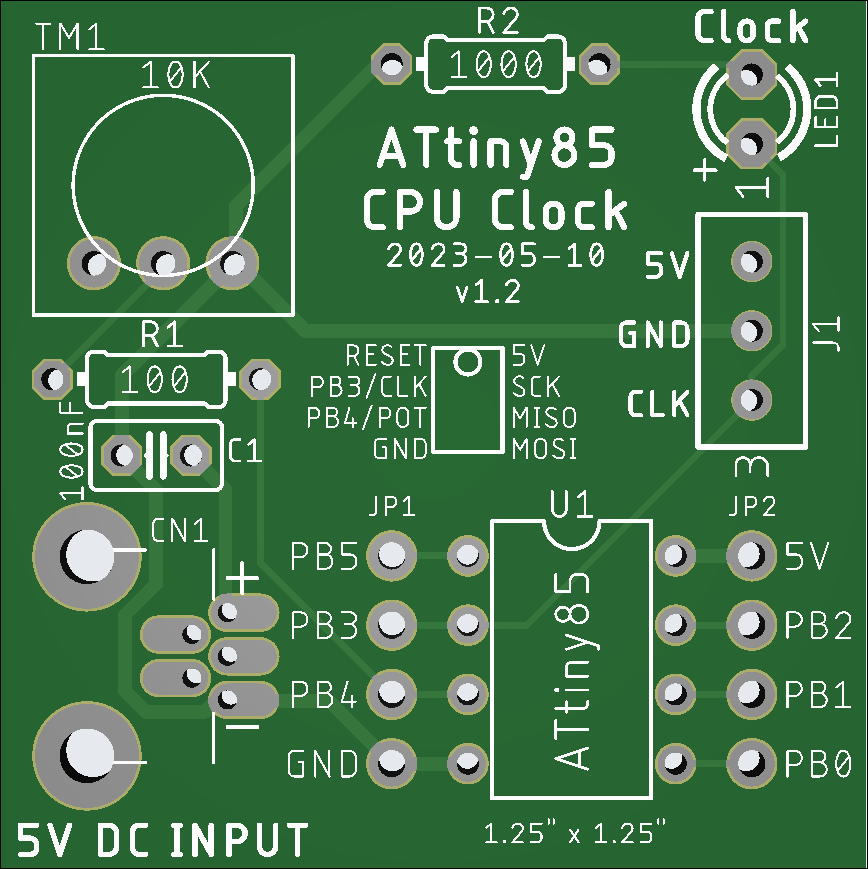
v1.2 Schematic v1.2 Board Layout v1.2 PCB v1.1 Operation (Click for video)
Description: There are several projects involving CPU clocks and this is another but using a Microchip (formerly Atmel) ATtiny85 microcontroller for speeds between 0.5Hz and 50Hz. Simply twist the potentiometer knob to vary your speed.
Code: ATtiny85_CPU_Clk_2.ino |
||||||||||||||
|
Configure Your Arduino UNO as an ATtiny85 Programmer (Windows 10 Methodology):
At https://www.arduino.cc under Software, download the Legacy IDE (1.8.x) which should be Arduino IDE 1.8.19; Download Option is Windows Win 7 and newer. Install it in the default path: C:\Program Files (x86)\Arduino. Use the Arduino desktop icon to start up the app. Under File | Preferences, enable Show verbose output during upload.
Click the icon to the right of Additional
Boards Manager URLS and add the following lines, then finish
with OK:
Under Tools, click Board, navigate right and click Arduino AVR Boards. To the right, click Arduino UNO. On your Desktop, right-click This PC then click Manage. Choose Device Manager and open up Ports (COM & LPT). Plug in your UNO and note which new port appears. Close Device Manager. In the Arduino app, return to Tools, navigate to Port and select the Device Manager port; Win10 may have already recognized it. Next: Tools | Get Board Info. The popup info window proves to you that the app and board are talking. Next: Tools | Programmer. It is imperative you make note of the selection AVRISP mkII. Your UNO must use this choice for any programming you perform on the UNO itself. However, when you use the UNO to program another device, then you will choose Arduino as ISP. Do NOT mix these two up: UNO programming is AVRISP mkII, UNO programming another microcontroller is Arduino as ISP.
Under File | Examples | 11.ArduinoISP, select ArduinoISP. Close the original default sketch now that the one you need is open. Failure to do so will periodically cause intermittent problems. Sigh. At the top of your app, the second button from the left is a right arrow which when highlighted reads Upload: press it. When the file finishes uploading, you will have have programmed your UNO to become a programmer but it cannot do so unless you return to Tools | Programmer and set Arduino as ISP. Close the current sketch.
The code link above is what we need to program the ATtiny85, however some browsers may get 'bent out of shape' if we provided you with a .ino file so it has been zipped up. Unzip it to your Desktop, open the file-named-folder and double-click the file, ATtiny85_CPU_Clk_2.ino. This is the file with which we'll program our little ATtiny85. Under Tools | Board, notice that the ATtiny boards are not listed. We'll need to navigate to Tools | Board | Boards Manager. Ensure Type All is chosen, then type attinycore and click Install. Today's screen (2023-04-24) shows v1.5.2 as being the most recent. Click Close.
Close the Arduino IDE app and double-click our .ino file to reopen it. Navigate to Tools | Board | ATTinyCore and select ATtiny45/85 (Optiboot). This is NOT the board we want but it will serve our purpose for the moment. Navigate to Tools | Clock Source(...) and choose 8MHz(internal). While here, note that there is no provision for a 16MHz internal clock. That is why this is NOT the best driver for your board for our needs: we need the ATtiny85 microcontroller to run with a 16MHz clock, otherwise our timing routine will not work properly. Return to Tools | Board | Boards Manager. Ensure Type All is chosen, then type attinycore, select the driver and click Remove. Click Close.
So, let's start over. Clear out the Preferences listing using File | Preferences | Additional Boards Manager URLs so that none are left. Add in the following: https://raw.githubusercontent.com/damellis/attiny/ide-1.6.x-boards-manager/package_damellis_attiny_index.json. Click OK twice. Now that the URL is available to the app, when we navigate to Tools | Board | Board Managers, we can type ATtiny and select the David A. Mellis driver to install: the current version is 1.0.2. Click Close. Close and restart the app.
Under Tools |Board you should now see ATtiny Microcontrollers. Select ATtiny25/45/85. Return to Tools and you should see that selection listed. Make the following changes: Processor "ATtiny85" and Clock "Internal 16MHz". Your Port should be the same. You cannot use the Get Board Info selection because the ATtiny is not setup for USB comm.
Now we need to make a change to the UNO programmer. Under Tools | Programmer, change it to Arduino as ISP. Place the ATtiny85 in a breadboard and wire it as follows:
This next step is really important: place a 10uF electrolytic capacitor between the UNO's RESET pin and ground, ensuring the correct polarity. The cap MUST be used anytime you are using the UNO to program another device like the ATtiny85. Any programming you perform on the UNO itself requires the removal of the cap.
It is most likely that your ATtiny85 does not have a bootloader so we'll upload one to it. This is only done once and does NOT need to be repeated. In the IDE, choose Tools | Burn Bootloader after ensuring that you can see what is going on in the lower black portion of your app where the communication activity takes place. Under Sketch choose Upload Using Programmer (Ctrl+Shift+U). Do NOT choose Upload; it is only used when uploading code directly to the UNO. Currently we are using the UNO as a programmer and not as a recipient device.
If you have wired the ATtiny85 with a pot, a couple of resistors and an LED as per the schematic at the top of the page, the LED should be flashing if the pot is set to half-way. You can remove the UNO but it needs to be set back to being able to be programmed itself: Tools | Programmer | AVRISP mkII.
That's it you're done! If you wish to make changes to the code, wire up the ATtiny85 to also include the 4 programming wires, change the programmer function to Arduino as ISP, and use Upload Using Programmer (Ctrl+Shift+U) to send the code.
|
![]()
Updated 2023-05-10 @ 2pm